
Sophia And David *in love*

I apologise for not posting before. :-/ I wanted to dedicate an entire post on "How To Post Images". Wahahaha~ But I reached home late, watched TV till even later, and by then I was too tired to log online liao...and that's why you only see Sophia so lonely. Heh~
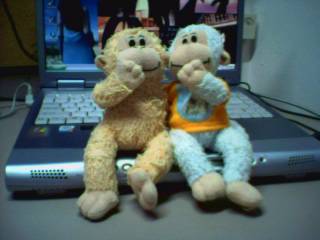
Here's another eye-candy for you...presenting Sophia and David!!!! They make such an adorable pair, don't they? Hehe~ Okies...I am having this "monkey madness" these days...pardon me yah. Haha~ But they are really very cute lar. :-) My friend says it's an acquired taste. Maybe only I can see how adorable my monkeys are. Hehehe~
Anyway. How to post pictures, you ask? Very simple lar.
One way is to download that "Hello Program" recommended by blogger so that you can post pictures directly onto the blog. Not only that, blogger will host the picture for you too!!! :-)
However I don't really recommend because even the tech-savvy me took quite some time to learn. Hahaha~ I think I prefer the tradiational method lar. Heh~
So just listen up!!! :-D
First. Get an image-hosting account to host your images. In case you are wondering, image-host is machiam the server that's on the internet which will store your digital images lor. :-) I recommend you to sign up for an account at http://www.photobucket.com I have been trying a lot of servers, this one is by far the most satisfactory.
Second. Upload your images on the webbie lor. For your information, you can upload direct, or create folders and then upload your photos to it. It's very straight-forward on the webbie, so just click around and play lar. :-)
Third. After you have uploaded your picture you should see some lines of code below. Look for the one that says "Tag". In the box beside you will see something that looks like "img src=http:......." That code hor, you COPY that entire line okies. From the first "<" to the last ">" inclusive. Heh~
Fourth. Having copied liao, open your blogger editor. On the top right-hand corner of this box you will see underlined Edit HTML. Click on that, and then you will see that suddenly the text box will have some funny codes here and there. Press enter to start a new line, and then Paste whatever code you had copied from the Photobucket webbie.
Fifth. To preview how it will look, just click on the Compose tab on the right-hand corner again, and then you will now see that your photo has loaded!!! You can adjust it to the center like those word documents lor...just place the cursor beside the picture and then click the appropriate buttons on top.
Ta-dah! You have just finished posting a picture! Yoohoo!!! :-P I was an avid user of that image-host too...haha...  See the smiley juggling balls? Heehee~ That's what I have been hosting. Plus a slew of pictures too.
 ![]()
I hope my instructions are clear enough okies. Heh~ Let me know if you encounter any difficulties yah. I will do my best to help!!! So you should open your blogger editor, open the photobucket.com in another window, and then switch to and fro the 2 windows yah. Heh~~~ :)
Have fun!!!

Stunningly Gorgeous Y 1:33 AM
